Amazon SES integration
The platform can send email through Amazon Simple Email Service (SES). Sending is performed directly through the Amazon SES API — the platform assembles the finished message and passes it to SES via SendRawEmail; no SMTP connection is used. To receive delivery statuses (delivered, bounce, complaint), Amazon SNS is set up on the Amazon side — events are subscribed to the platform's webhook.
Sender configuration
- Go to the Senders — Email section
- Create a new sender or edit an existing one
- In the Type field, select Amazon SES
Connection parameters
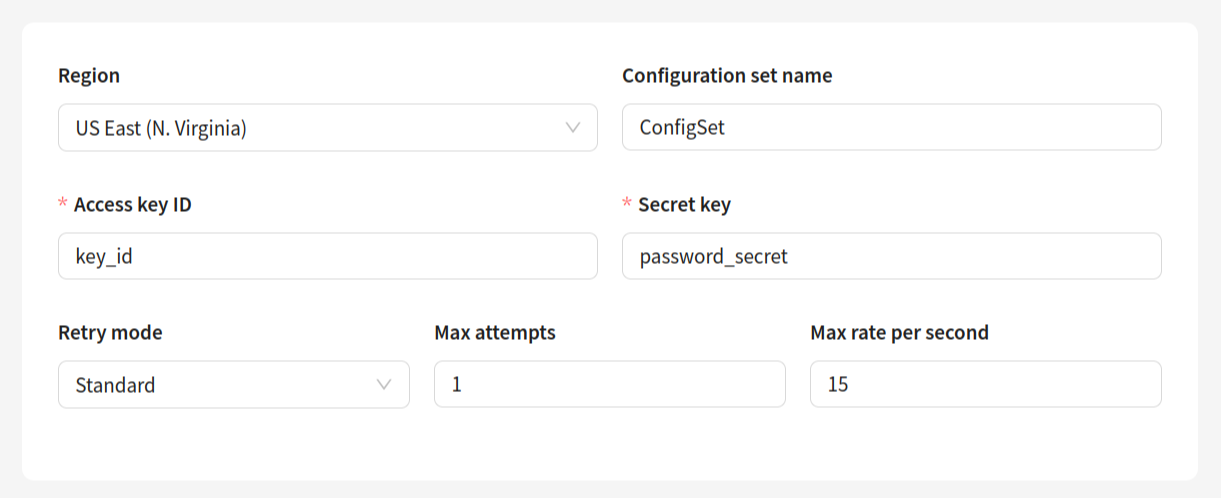
General settings:
- Region — your AWS region (for example,
eu-west-1); - Configuration set name (optional) — the name of the SES configuration set. If set, messages will be sent with this set, which lets you attach tracking rules to them on the Amazon side.
Credentials:
- Access key ID — the AWS access key (required field);
- Secret key — the AWS secret key (required when creating the sender; when editing, you can save changes without re-entering it).
The platform uses the specified keys as static credentials — you are responsible for IAM key rotation.
Retries and rate limiting:
- Retry mode — the AWS SDK retry mode:
- Standard (default) — the standard algorithm with exponential backoff. Suitable for most scenarios;
- Adaptive — an adaptive algorithm that takes the Amazon SES service load into account and automatically adjusts the retry frequency. Recommended under high load or when receiving throttling errors from AWS;
- Max attempts — the maximum number of send attempts on an AWS API error (a number, default 3);
- Max rate per second — the send rate limit in messages per second (a number, optional). If the value is not set or is 0, no limit is applied.
When Max rate per second is set to a value greater than 0, the platform limits the sending rate through Amazon SES using a token bucket algorithm. This lets you control the load on the AWS API and avoid throttling errors.
Receiving delivery statuses through SNS
To let the platform receive delivery statuses, an SNS subscription is set up on the Amazon side:
- In the AWS console, in the SES service, create or use an existing configuration set and add an Event destination rule of type Amazon SNS to it;
- Create an SNS topic and subscribe the platform to it: in the endpoint, specify the webhook URL that the platform provides for receiving Amazon SES events;
- The platform automatically confirms the subscription after it is created (nothing to do manually).
After the configuration, the platform handles the following SNS event types:
| Amazon SES event | Notification type | How the platform accounts for it |
|---|---|---|
| Successful delivery | Delivery | Delivery event |
| Complaint (spam) | Complaint | Complaint event |
Bounce, type Permanent, subtype General/NoEmail | Bounce | Hard bounce (the address is treated as undeliverable) |
Bounce, type Permanent, subtype Suppressed | Bounce | Soft bounce |
Bounce, type Transient or Undetermined | Bounce | Soft bounce |
Bounce, subtype ContentRejected/AttachmentRejected | Bounce | Non-delivery (suppression) with no retry |
| SNS subscription confirmation | AmazonSnsSubscriptionSucceeded | Logged only, no event is created |
The webhook URL and its availability are an internal platform configuration: to obtain the exact URL and connection instructions, contact your support engineer.
Statistics specifics when working with Amazon SES
- Delivery, bounce, and complaint statuses arrive from Amazon with a slight delay after the actual sending, so values in reports for short periods may lag behind the actual ones;
- Unsubscribes via the
List-Unsubscribeheader and clicks on unsubscribe links are accounted for by the platform as regular unsubscribe events; - As the main source of analytics, we recommend using the platform reports, and the Amazon SES data — for verification and diagnostics.
Connecting to a virtual sender
After creating and configuring the sender, you need to add it to a virtual sender through the platform's user interface. To do this, open the platform, go to the Settings — Virtual senders section, and configure the rules for sending through the created sender.
For more details on virtual senders, see this article.